CullMaster Pro
Helping humans cull their shoots, fast AF.
It's as if Photo Mechanic, Adobe Bridge, and Lightroom Library all committed their DNA to a single baby. Super fast, efficient, and delivering exactly what photographers need to see to judge the worthiness of a photo at lightning speed.
Built for power users who want culling in their own hands — with technology backing you up like you've never had before. You decide; it makes deciding fast.
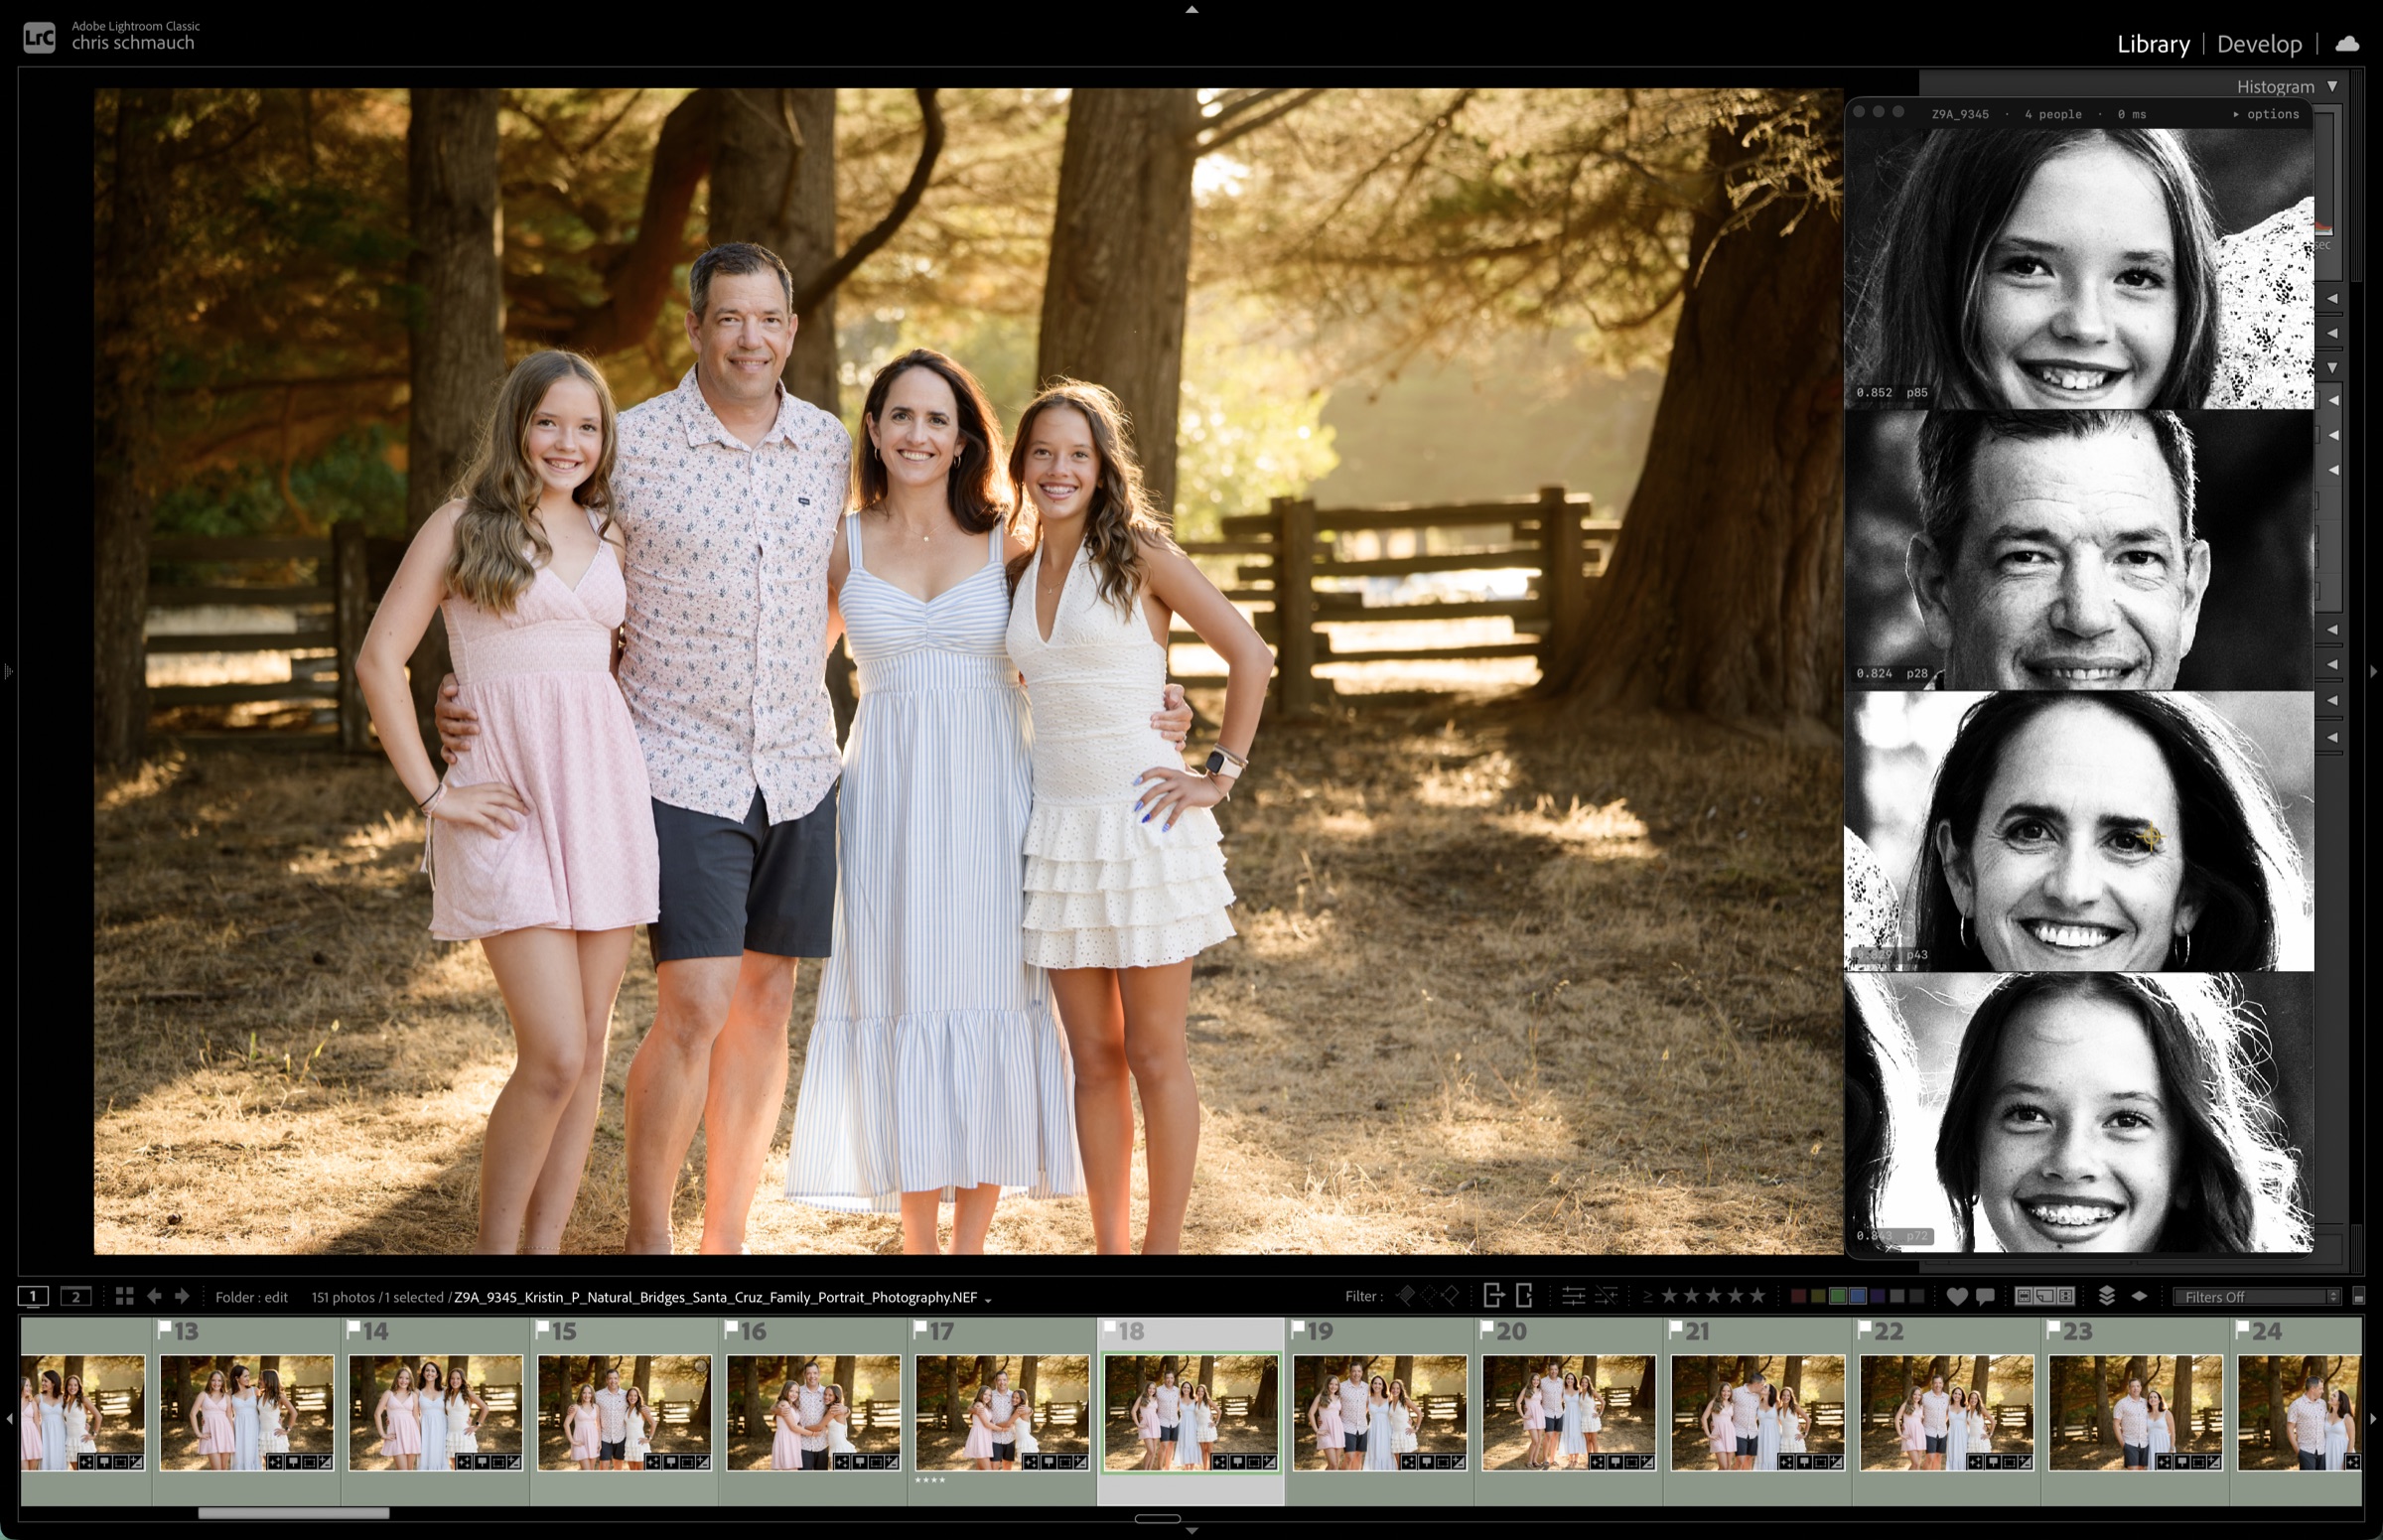
- Every face at 100% the instant you landNo building 1:1 previews to check focus
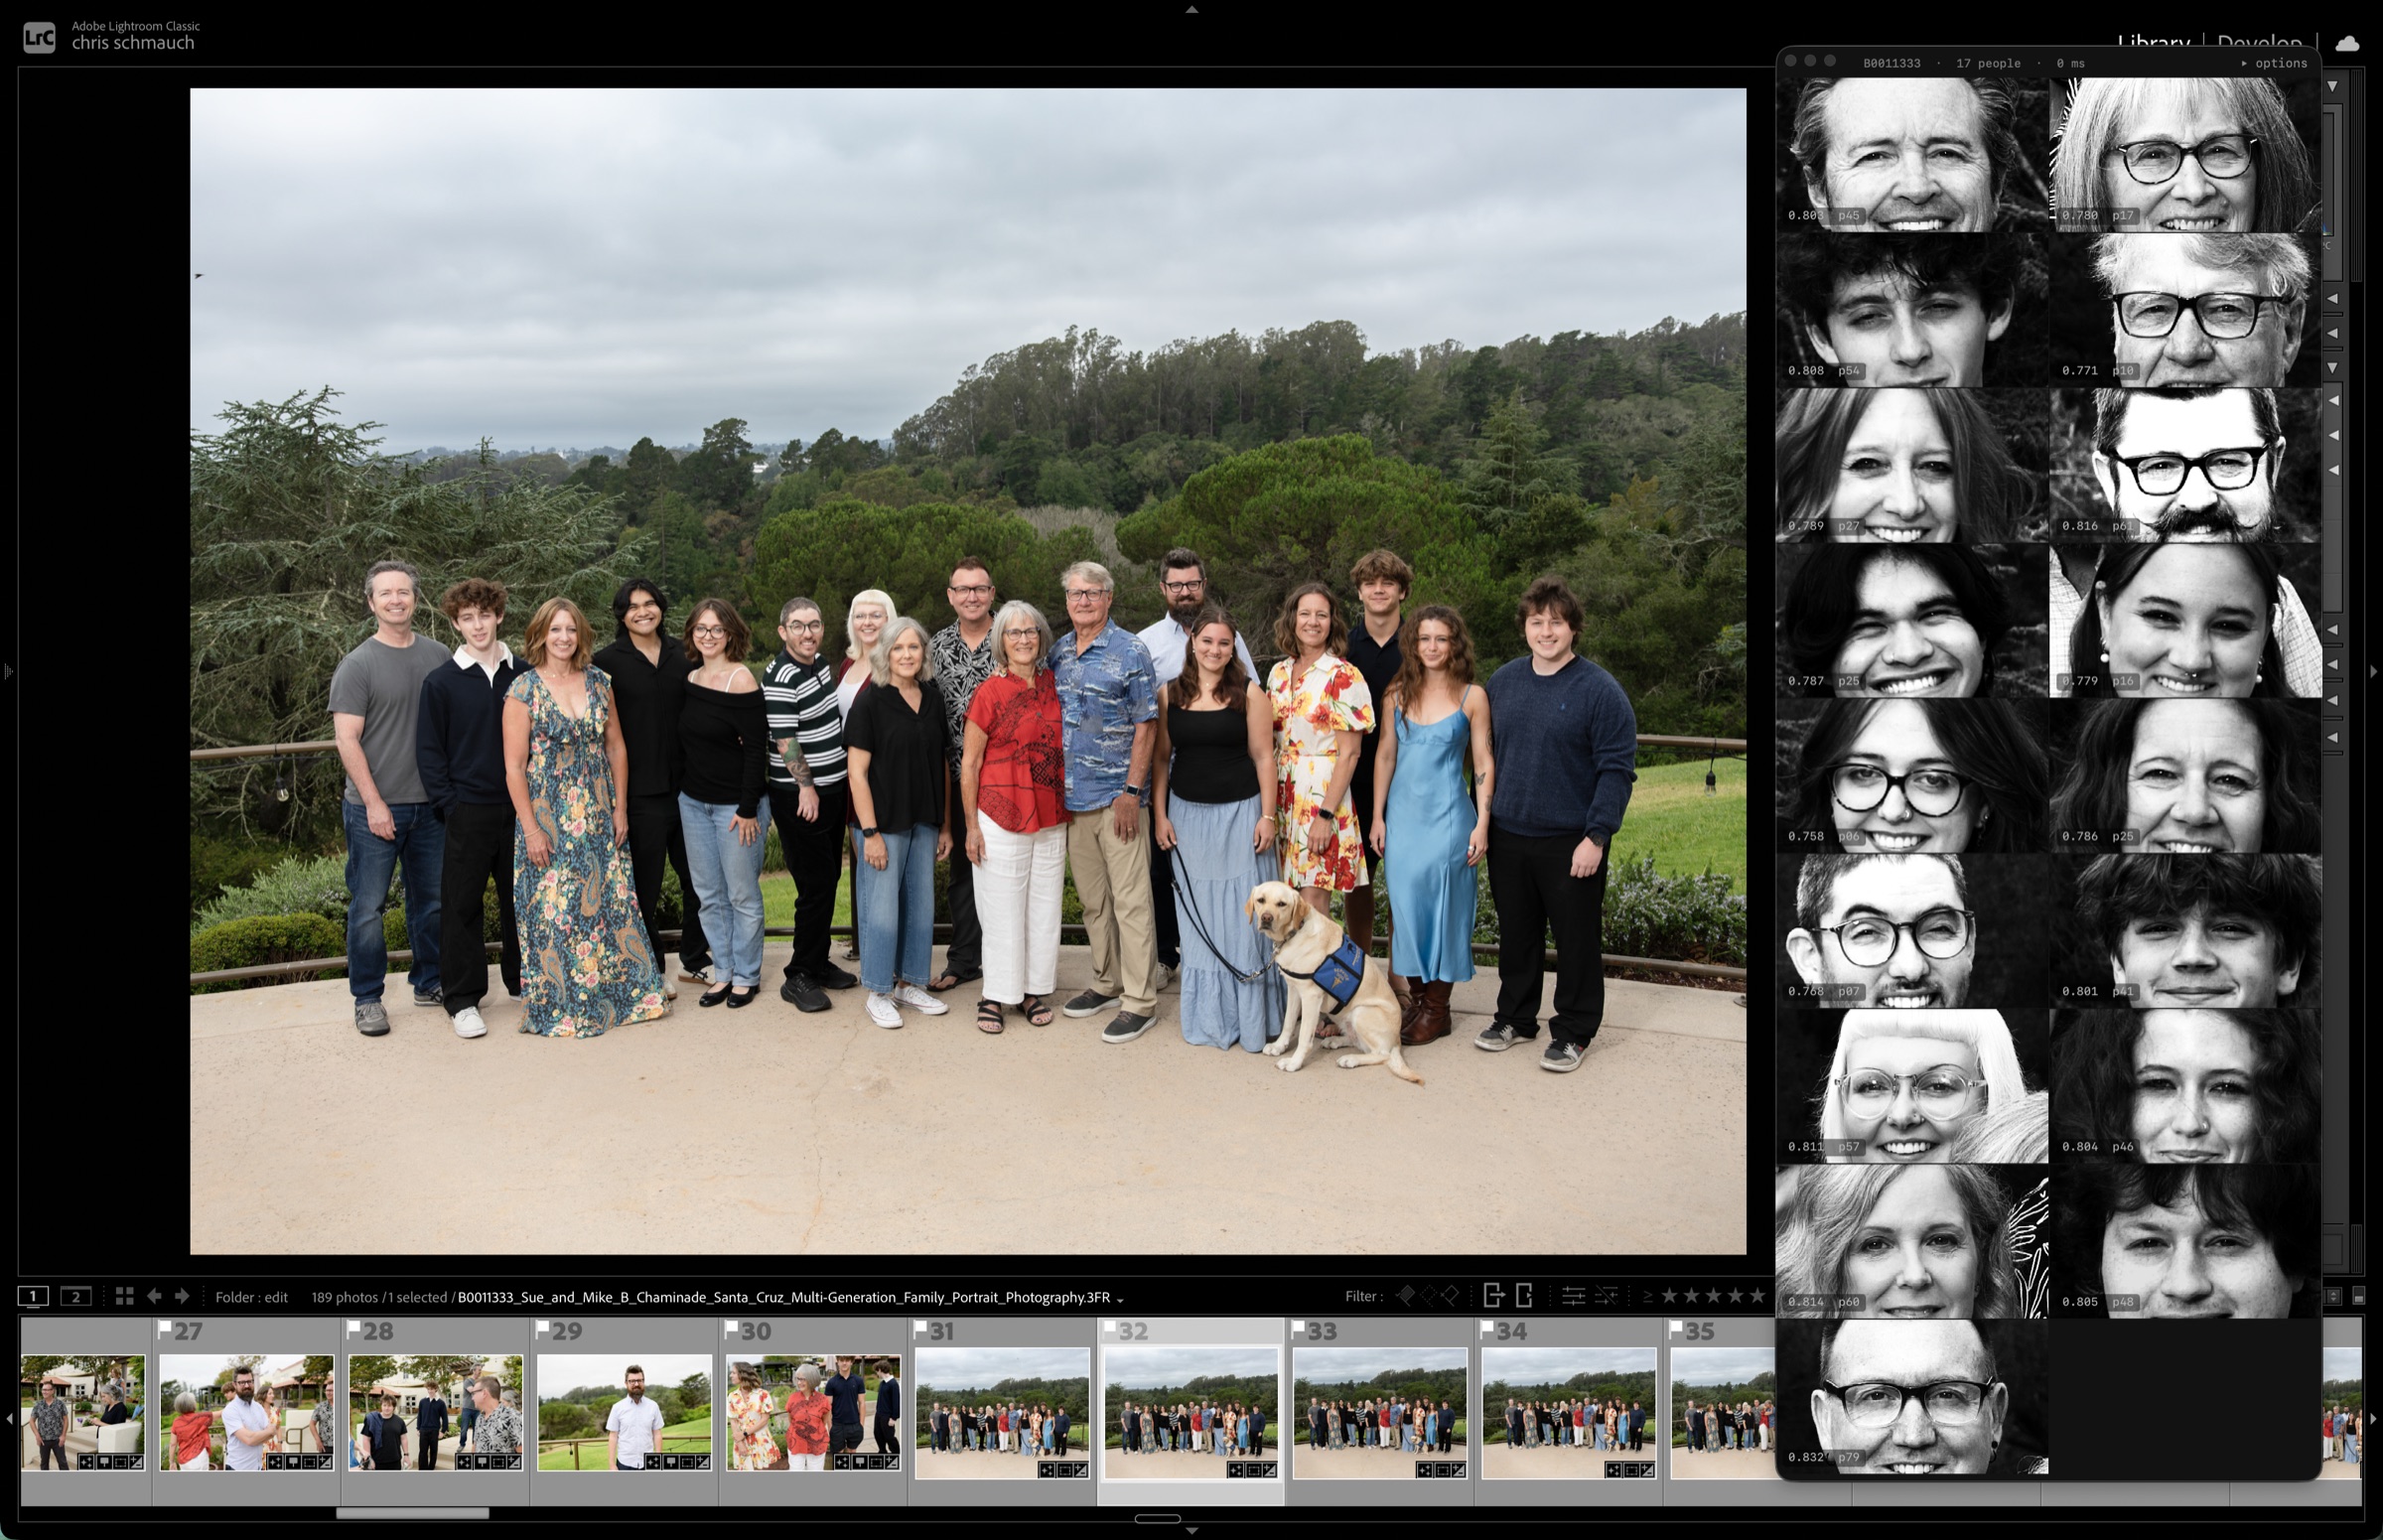
- Finds everyone in a group17 of 17 on a family photo, not just the front row
- Shows where the camera focusedRead straight from Nikon and Canon files
- Nothing to wait forRenders ahead of you while you cull
- Culls like LightroomP, stars, labels, X — synced with your catalog both ways, with ⌘Z undo
- Won't slow Lightroom downAll the work happens outside it
- Paste a client's edit listEach photo carries its request, with a Mark done button and a running count
- Slideshow and JPEG exportCrossfades and Ken Burns straight from the culled set
- Any module, any viewLibrary grid, single photo, Develop
- Stays out of your wayMovable, resizable, rolls up in one click
Bridge's folder tree, Photo Mechanic's speed, Lightroom's flags — with every face at 100% beside the photo.
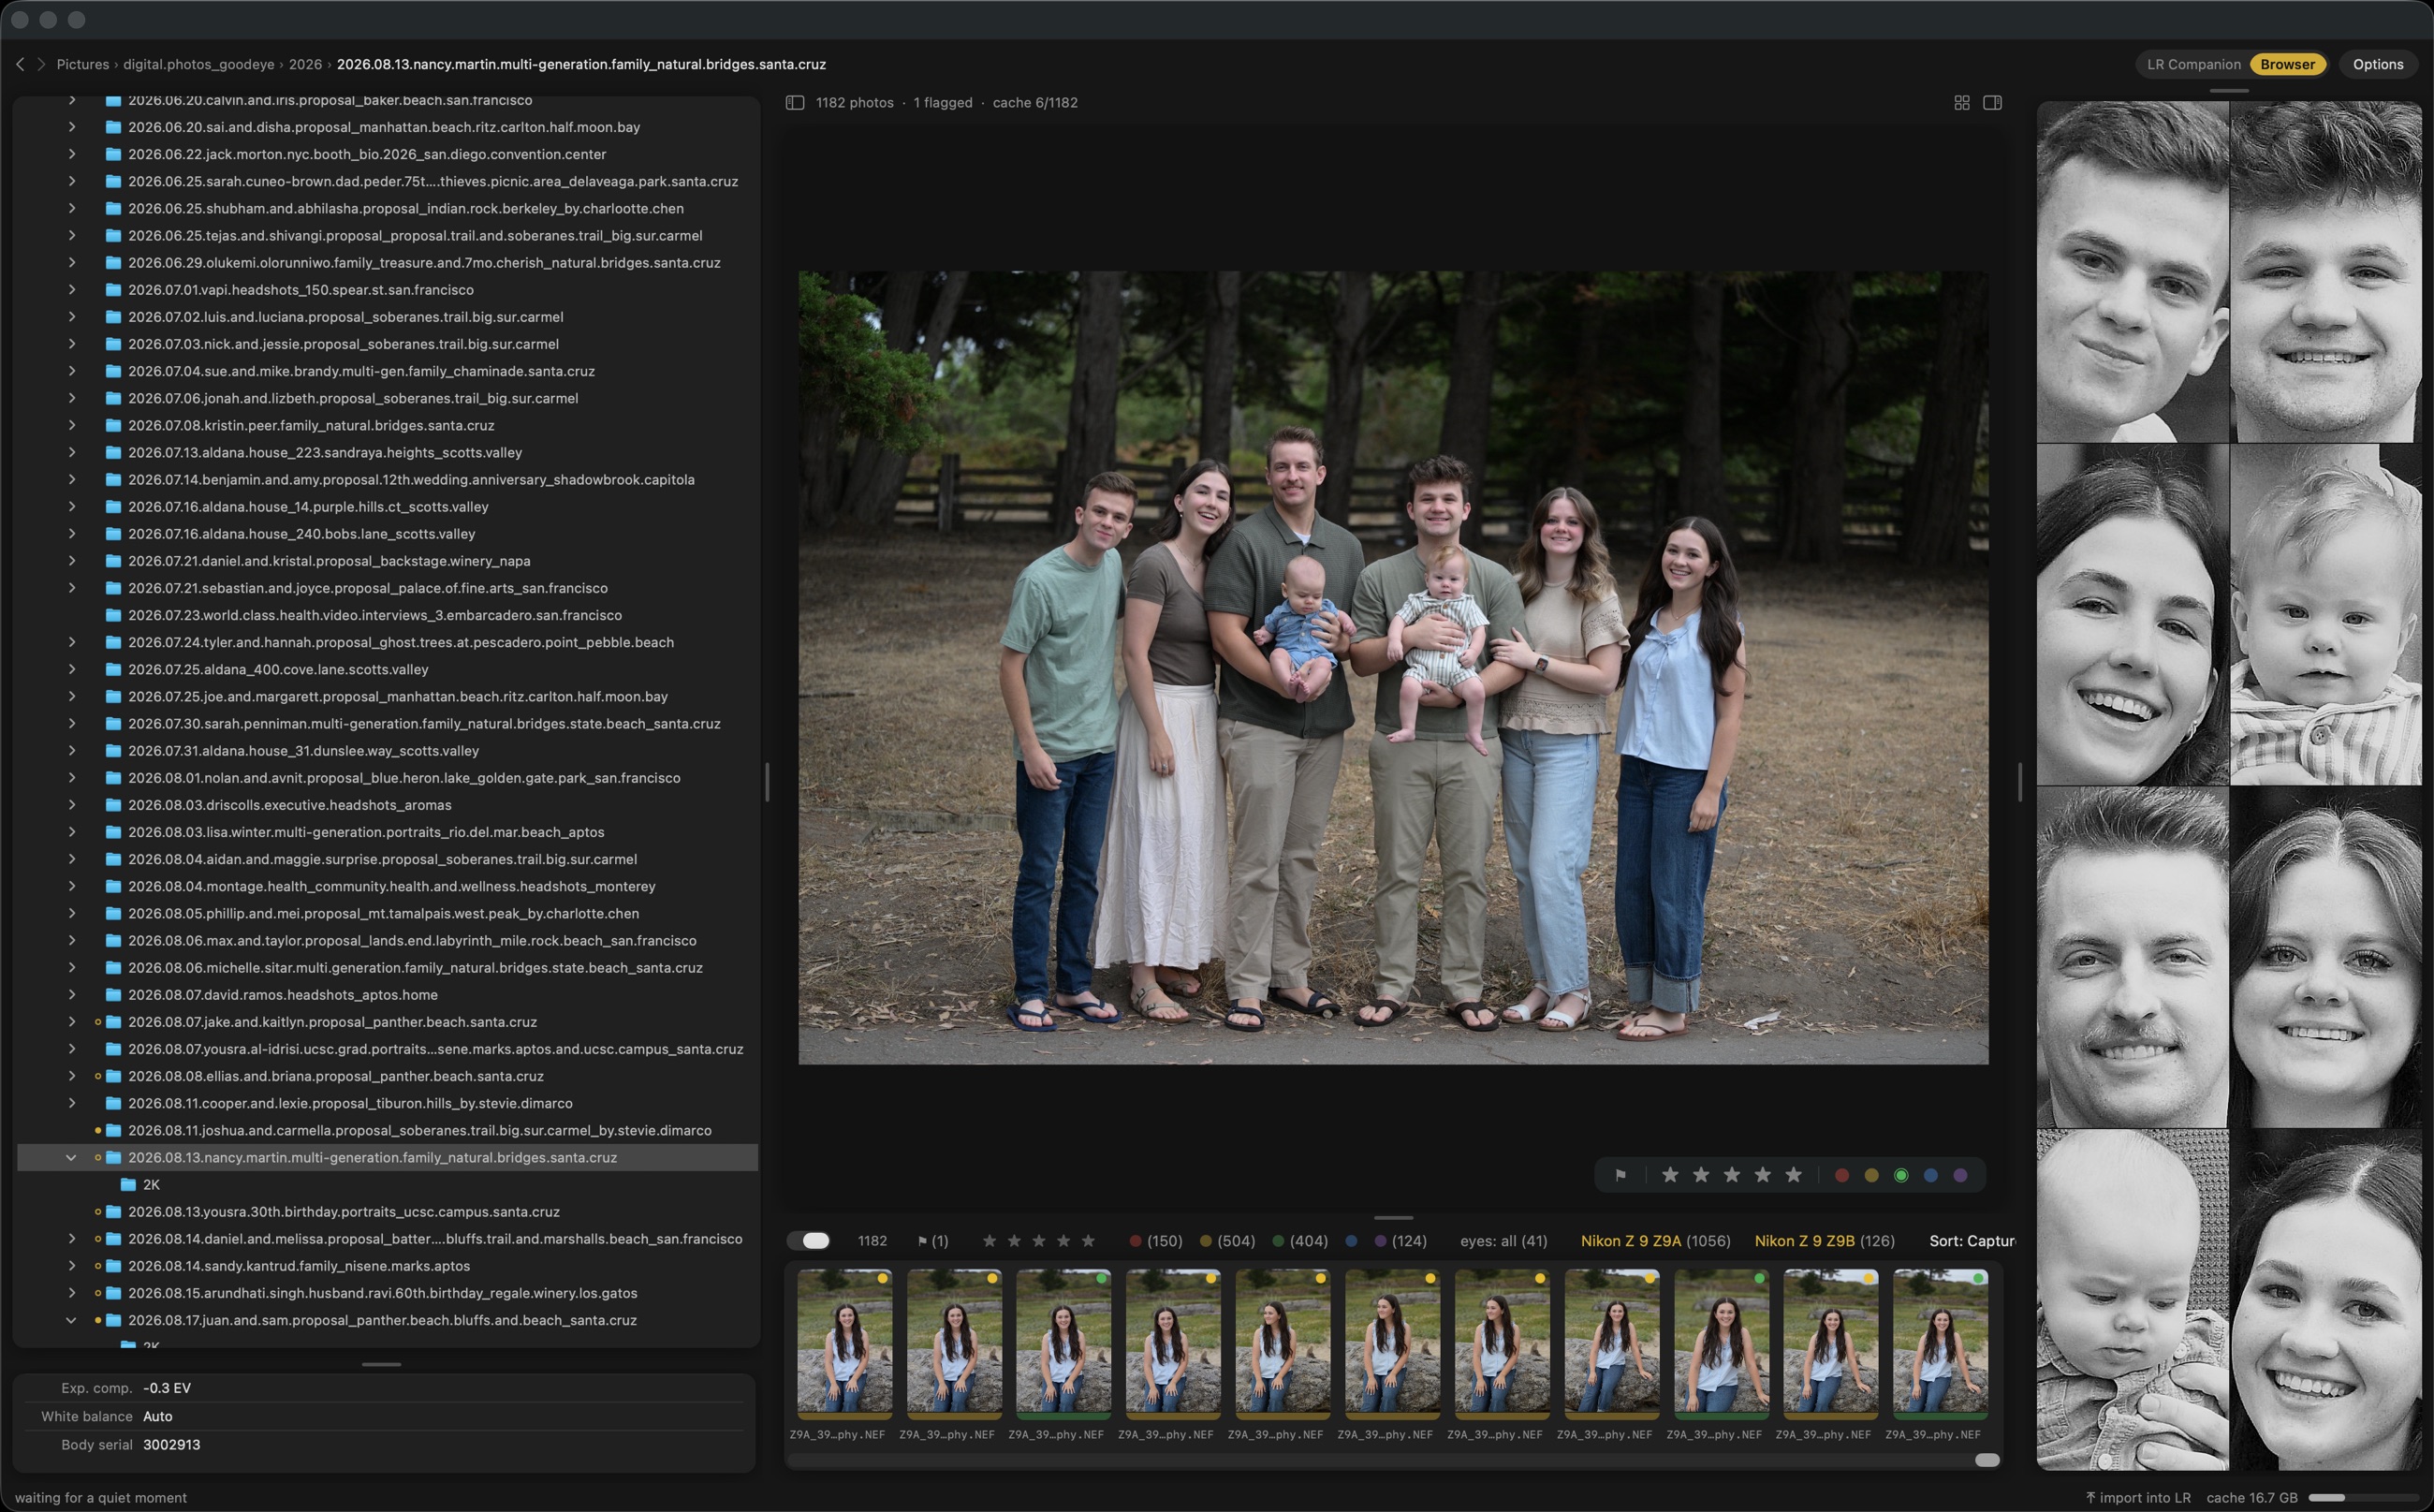
- Contact sheet (G), filmstrip (E), full-screen review (Space) — straight off the camera JPEG with no 1:1 previews to build.
- Your picks (P), stars (0–5), labels (6–9), and rejects (X) flow into Lightroom automatically, and LR's flow back.
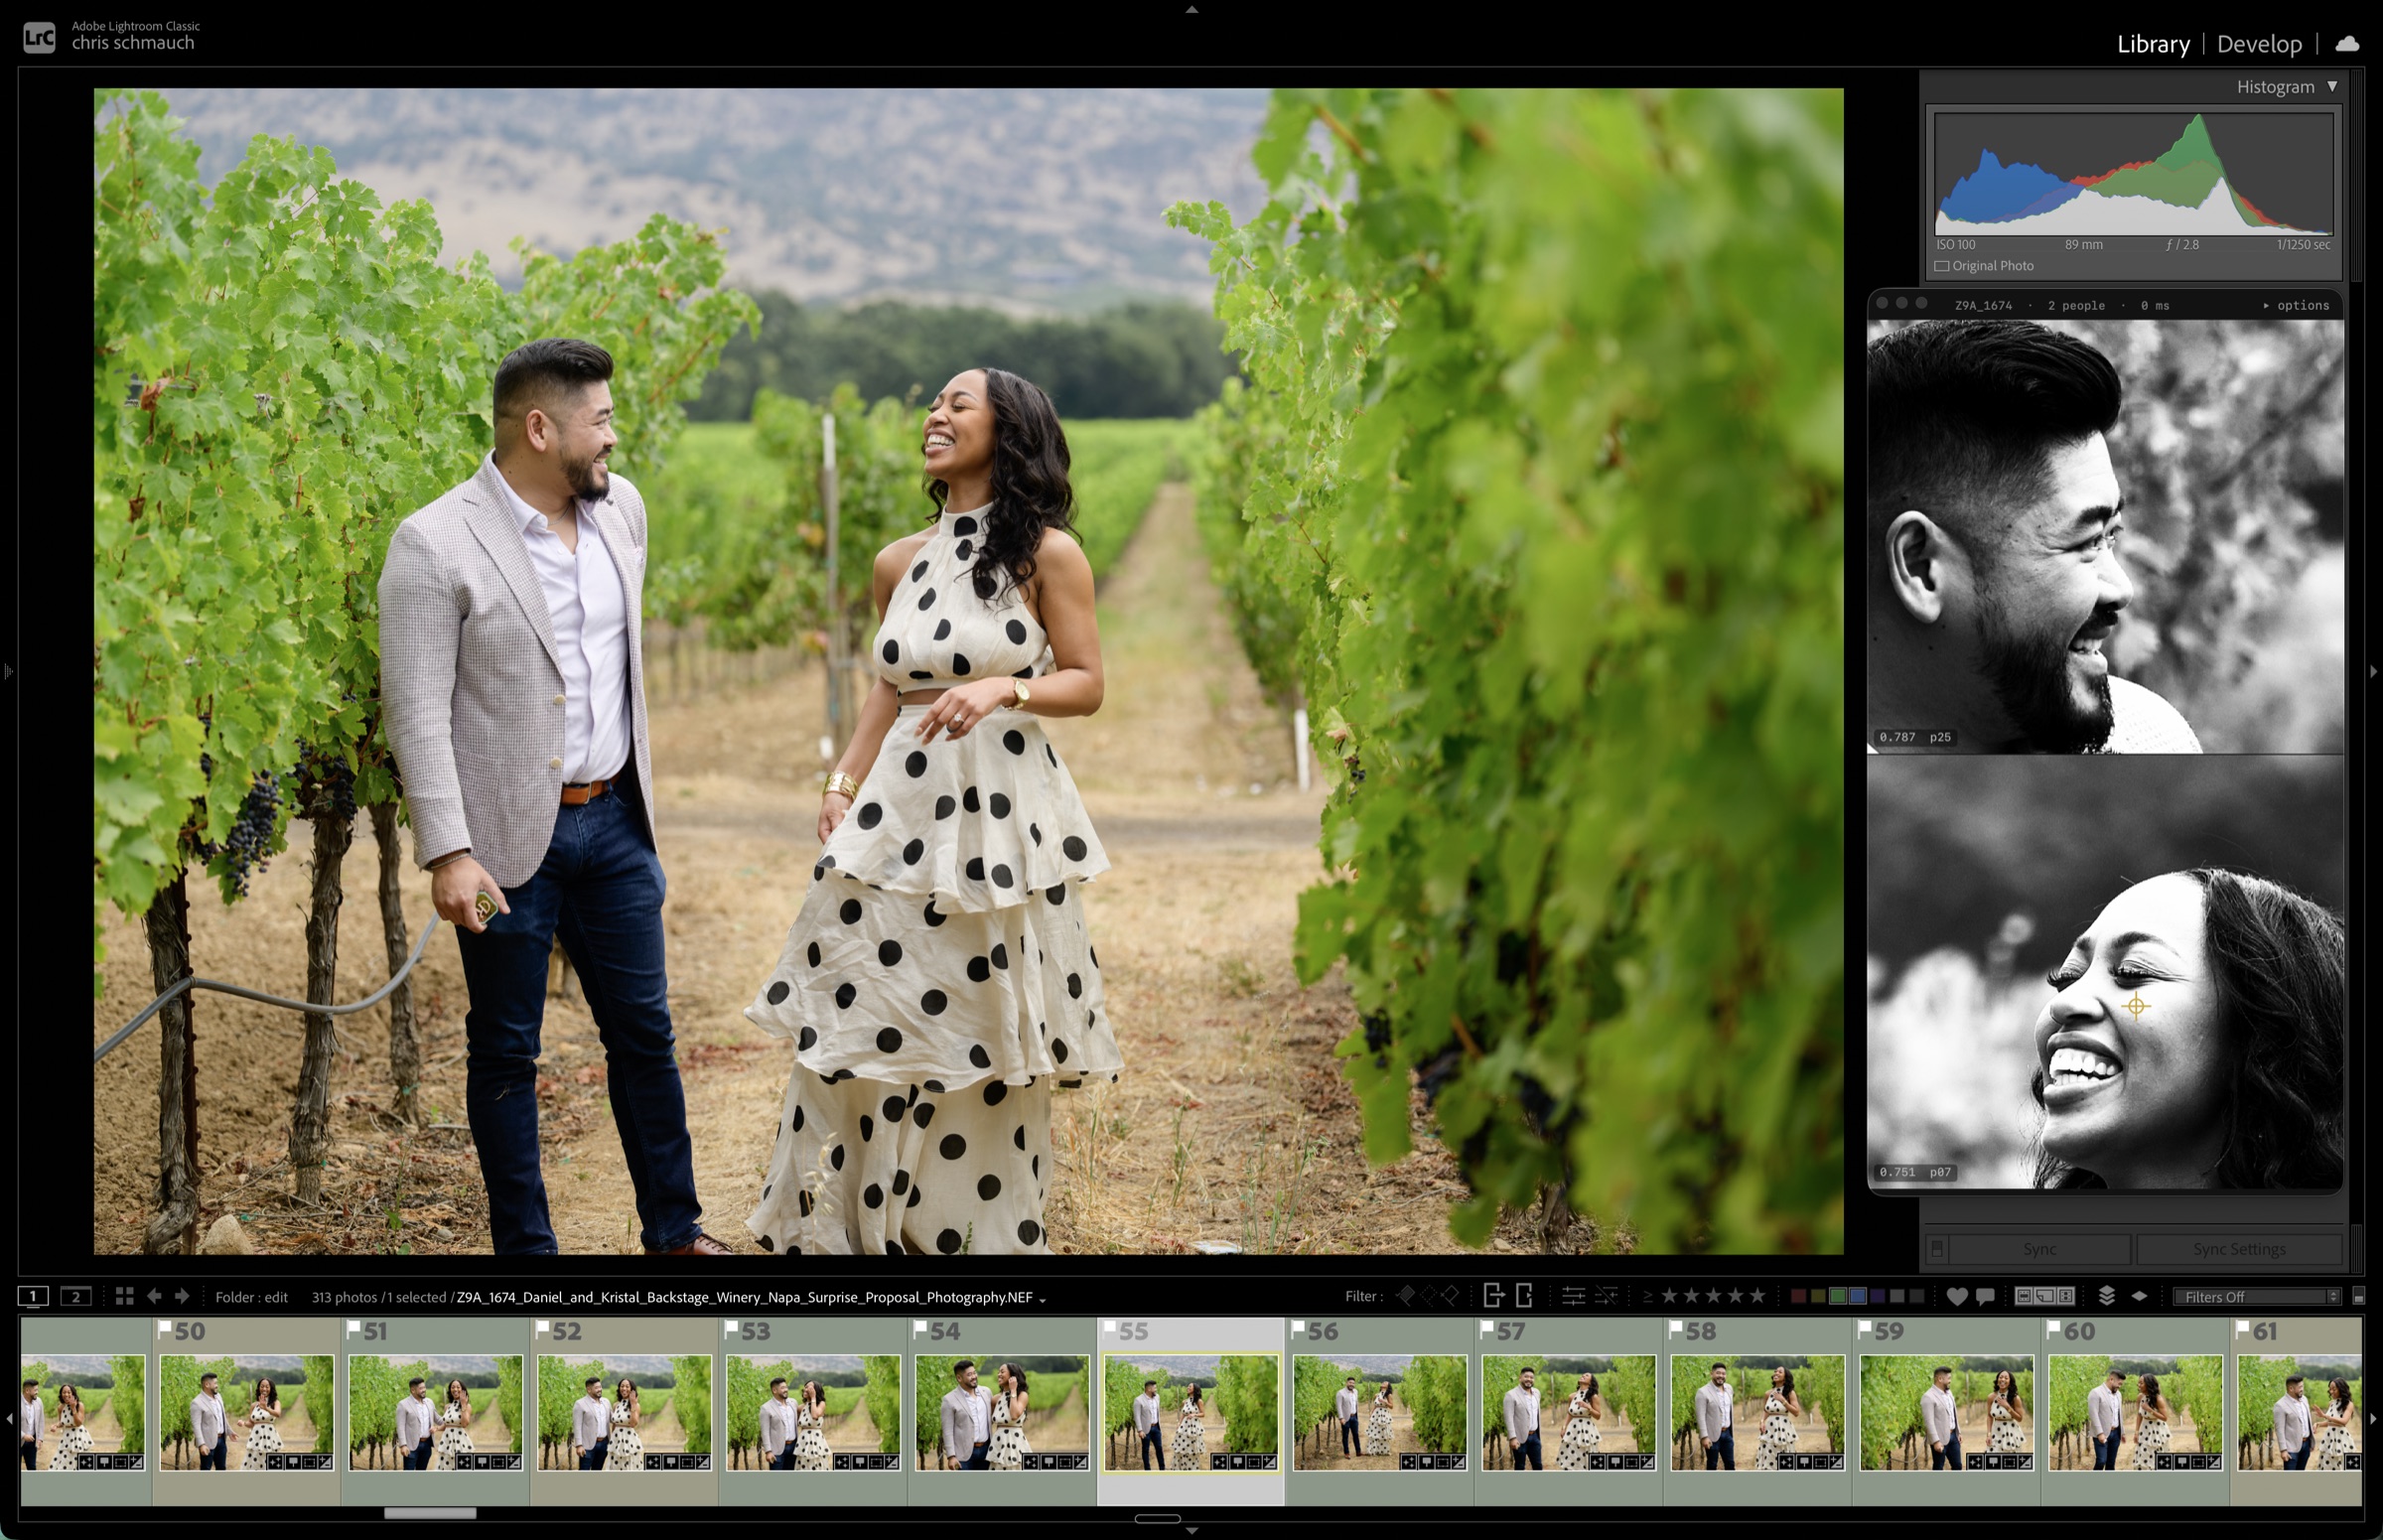
- Every face in the selected photo as a true 100% crop from the RAW (F floats them over full-screen), plus where the camera focused (Z zooms to 1:1).
- Edited Preview (A): your develop settings simulated on the RAW — close to your edit, not exact, one key to flip.
Cull a folder like a browser. Sync it like Lightroom.
Point it at a folder and cull — before Lightroom ever sees the shoot, or without Lightroom at all. A folder tree that includes your cloud drives, a contact sheet (G), a filmstrip (E), and a full-screen review (Space) with every face floating over the photo (F). All of it runs off the camera's own JPEGs, so a thousand-photo shoot browses instantly with nothing to build first.
Full-screen is a complete culling surface of its own: floating face tiles, a ghost filmstrip while you navigate, a zoom that lands on the spot you click, and TAB sweeps everything but the photo away.
The panel that rides shotgun in Lightroom
Drag it anywhere on screen and drag its edges to size it. Both are remembered, including after a restart, and neither moves on its own — only the height changes with how many people are in the photo.
It floats above Lightroom, even in full screen, and never takes focus, so your keyboard stays in Lightroom while you cull.
We finish our 1:1 pass before Adobe finishes the first lap
Did I nail focus? On a family of six that is six separate questions, and Lightroom answers them one zoom at a time. Somebody blinked, somebody drifted off the plane of focus, and finding out which means building 1:1 previews for the whole folder and pushing into every face on every photo.
There is no pass to run. Open a folder and start culling — the faces are there. The app renders quietly in the background as you work, always a few photos ahead of where you are, so it is ready before you arrive. No progress bar, no go-make-a-coffee break, no deciding in advance which folder you will need later.
Land on a photo nobody has looked at yet and it takes about half a second. Every photo after that is single-digit milliseconds, because it was rendered while you were looking at the last one.
You can also render a whole folder up front, if you would rather have it done before you sit down. Here is that against Lightroom building its 1:1 previews for the same folder — and the times are the smaller half of the story.
Every face, in your face.
Extras, when you want them. Never in the way.
CullMaster Pro is a culling tool and stays one. Labs is where anything else lives: each module explained in plain language, off until you turn it on, and none of it changing how the rest of the app behaves. It is how a new idea reaches you without the app you use every day getting heavier. Open it from the CullMaster Pro menu.
Install and setup in 2 minutes flat.
- 01Drag CullMaster Pro into your Applications folder and open it. A narrow dark panel appears saying “bridge not running” — that is expected, it has nothing to follow yet. The app installs its Lightroom plug-in on its own (upgrading from GoodEye Loupe? double-click the app on the disk image and it replaces the old copy, settings and cache kept).
- 02Quit and reopen Lightroom. It only looks for plug-ins at startup. From then on the bridge starts with Lightroom; if it ever does not, Library ▸ Plug-in Extras ▸ CullMaster Pro — start bridge.
- 03Click any photo. The LR Companion fills in.
- 04To cull without Lightroom, click the browser control in the header (or drop a folder from Finder onto the window) and open a shoot. Press ⌘/ in either mode for every key.
After that, step four is the only thing you ever do — and it launches the app for you, so one menu item starts everything.
Watch it work
We read your RAW files. The catalog is written through Lightroom's own front door.
The Lightroom plug-in tells the app which photo you are on and which filter you are working under — and it carries your verdicts back. Flags, stars and labels land in the catalog through Lightroom's own plug-in API, the same doorway Adobe gives every plug-in, applied within a couple of seconds while Lightroom runs. Nothing is injected behind Lightroom's back.
Two honest exceptions to "everything goes through Lightroom". Culling a shoot before it's imported? Your verdicts merge into the photos' XMP sidecars surgically — the develop settings already in those files are preserved byte for byte. And folder colour labels, which Lightroom's API has no way to set, are written directly to the catalog only while Lightroom is closed — the exact value Lightroom itself would write. Your develop settings are read (that's the Edited Preview), never written; your previews are never touched at all.
The app then opens that RAW itself, in its own process. So it is not riding on Lightroom’s speed — it never waits for Lightroom to render anything, does not care how big your previews are or whether you have built them at all, and none of the decoding, face-finding or drawing happens inside Lightroom.
It will not slow Lightroom down either. The plug-in’s entire workload is checking a flag and writing one short line of text when you change photos. That is it. Everything expensive lives on the other side of the fence.
The honest consequence: by default you are looking at the unedited capture, so exposure and colour will not match your develop work. For judging focus that is what you want — sensor data, not a look. When you want the look, press A: the Edited Preview renders your develop settings from the sidecar. It's a simulation — close, not exact — usually nearer to your edit than the camera's own JPEG, and it's one key to flip on and off as needed.
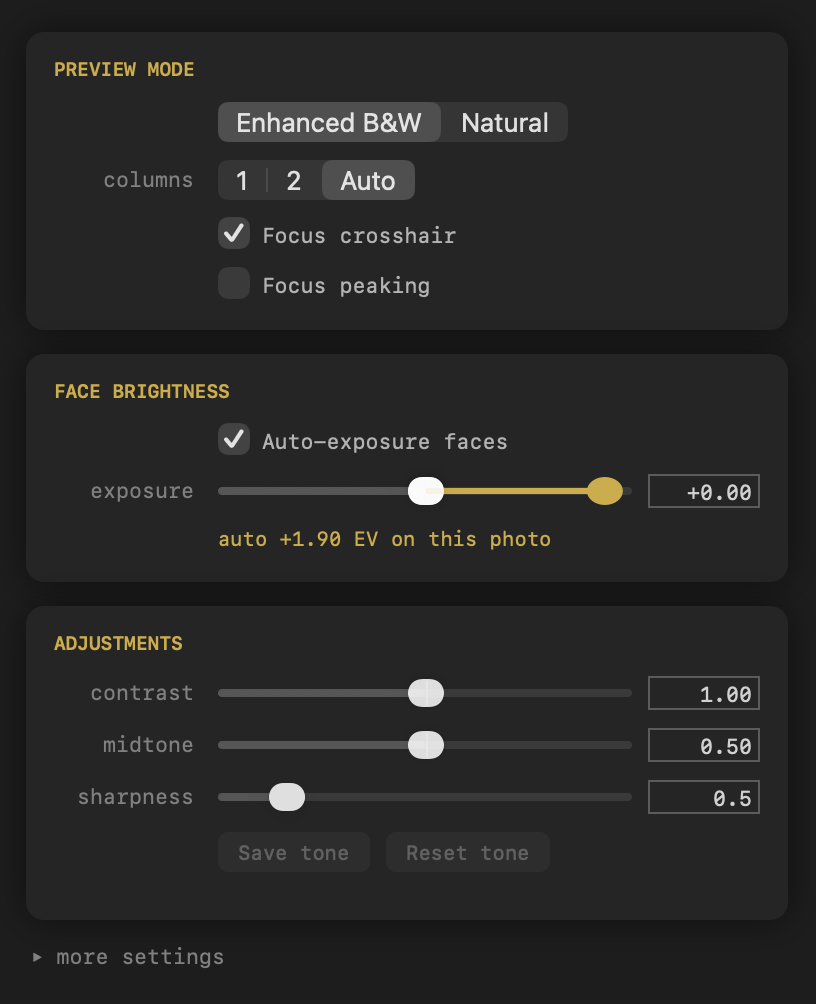
Preview the raw faces, or our enhanced view that makes soft focus obvious.
Both are cached separately, so flipping between them is instant after the first look at a photo. Exposure, contrast and sharpness are sliders too, and they repaint the photo live as you drag — nudge a shoot that runs dark without it sticking, or press Save tone to make it your new default.
The exposure track turns gold when the meter is driving it, and the second thumb marks where the exposure actually landed once the meter added its share. The gap between the two is what the app did on its own — visible rather than hidden, so a preview never quietly stops matching the file.
It learns each person's eyes. Then it tells you.
Everyone's eyes are different. We measured it on a real family shoot: across ten people, the normal eyes-open look varied by nearly 70%. So a blink detector with one bar for every face is wrong about somebody in every photo — it flags people who naturally have narrower eyes, and it waves through half-lidded shots on people who don't. That's why most blink detection is garbage, and why we don't use a generic one.
Instead, the app learns each person in your shoot individually. While it caches in the background, it measures every face it renders — quietly building what YOUR bride's eyes look like open, what grandpa's look like open, in this light, on this day. A face only gets the red tint when its eyes drop well below that person's own normal. Not some stranger's normal averaged from a training set. Theirs, from the photos sitting in the folder.
And until it's seen someone enough times to be sure — a few dozen appearances — it says nothing at all. You'll see “eyes learning” with a percentage in the footer while it studies the shoot, and a small gold dot once it's confident. No tint until then, because a wrong “eyes closed” on a keeper is worse than staying quiet. When it does flag one, it's worth your glance.
It measures per shoot on purpose: the same person squints more on a bright beach than in a shaded forest, so their baseline comes from the conditions they were actually photographed in.
We tried AI culling. And honestly, it suuuuucks.
It turns out the reason you pick one photo and not another is more than a machine analyzing pixels – it takes a human to “feel” if the photo works or not. Our tool simply speeds up the human ability to quickly assess whether a photo is a keeper or not. Simple as that.
That isn’t a hunch. Before any of this existed I spent weeks trying to build the ranker, trained on 13,172 of my own photos across 11 real shoots, labelled by the keep-or-cull calls I had already made. Four different approaches. Within a burst — the near-identical shots where you actually need help — not one of them beat a coin flip.
So this tool does not rank, sort, star or reject anything. Culling stays in YOUR hands — power-user hands — and the technology assists you like it never has before. It puts the evidence in front of you faster than you could dig it out yourself, and then it gets out of the way.
Here is the division of labor that actually works. A human brain assesses the emotional content of a photograph in a split second — whether the moment is real, whether the photo works — and no AI can do that. What a human can't do is zoom into every face on every photo to check focus and eyes, thousands of times a shoot, without the judgment going numb. So the software takes exactly that half: where the camera focused, every face up close, instantly, photo after photo. You never stop to dig; you just decide.
The human judgment is the winner here. Good human intuition with good software wins the game every time.
What it won't do
Each tile carries a sharpness number, and it is measured on the untouched RAW so no display setting can flatter it. But it does not know what you intended. A photo can be perfectly sharp on the wrong thing, and a focus-and-recompose shot reads as a miss at the focus point while your actual subject is exactly right.
So nothing here is colour-coded red or green, and nothing gets sorted or rejected for you. It puts the evidence in front of you fast. You are still the one who decides.
A face turned fully away is not detected — it falls back to the focus point, then to the sharpest part of the photo. Hasselblad files get face tiles but no crosshair, because Hasselblad does not record the focus point in any readable form. Sony: faces yes, focus point no.
Which cameras get which features
Selection following, face and eye tiles, exposure metering and the closed-eye intelligence work with every camera your Mac can decode RAW for. Two features depend on what your camera writes into its files, so we measured — one sample raw per body, 77 cameras from the last eight years, probed through the exact code path the app runs.
| Camera system | Focus-point crosshair | JPEG fast mode |
|---|---|---|
| Nikon Z & DSLR (NEF) | yes — Z bodies verified daily; DSLRs untested | yes — full-size on every body tested |
| Canon R, M & DSLR (CR3) | yes — measured across the R series | yes — full-size on every body tested |
| Sony (ARW) | no — Sony encrypts it | no — 1616 px preview only, every body tested incl. α1 / α7R V |
| Fujifilm X (RAF) | not yet | partial — ~4,400 px embed (57–71% of sensor) |
| Fujifilm GFX (RAF) | not yet | no — 4,000 px preview |
| Panasonic (RW2) | not yet | no — 1,920 px preview |
| OM System / Olympus (ORF) | not yet | no — 3,200 px preview |
| Pentax (PEF / DNG) | not yet | yes — full-size |
| Ricoh GR (DNG) | not yet | yes — full-size |
| Leica (DNG) | not yet | yes — full-size |
| Sigma fp (DNG) | not yet | yes — full-size |
| Hasselblad X (3FR) | no — the camera does not record it | no — ⅓-size preview |
JPEG fast mode renders from the JPEG your camera embeds inside each raw file — much faster, with your camera’s own sharpening. It is the default: where the embed is not full size, the app falls back to the true RAW render photo by photo, automatically, and a RAW-only mode is one click away in options. “Not yet” in the crosshair column means the camera records its focus point but we don’t read that maker’s format yet.
Every body we tested, with the measured embed size
| Canon EOS 90D | 6960x4640 | 6960x4640 embedded | 100% |
| Canon EOS M6 Mark II | 6960x4640 | 6960x4640 embedded | 100% |
| Canon EOS R | 6720x4480 | 6720x4480 embedded | 100% |
| Canon EOS R10 | 6000x4000 | 6000x4000 embedded | 100% |
| Canon EOS R3 | 6000x4000 | 6000x4000 embedded | 100% |
| Canon EOS R5 | 5088x3392 | 5088x3392 embedded | 100% |
| Canon EOS R6 | 3408x2272 | 3408x2272 embedded | 100% |
| Canon EOS R6 Mark II | 6000x4000 | 6000x4000 embedded | 100% |
| Canon EOS R7 | 6960x4640 | 6960x4640 embedded | 100% |
| Canon EOS R8 | 6000x4000 | 6000x4000 embedded | 100% |
| Canon EOS RP | 3888x2592 | 3888x2592 embedded | 100% |
| Fujifilm GFX100S | 11648x8736 | 4000x3000 embedded | 34% |
| Fujifilm GFX100 II | 11648x8736 | 4000x3000 embedded | 34% |
| Fujifilm GFX50S II | 8256x6192 | 4000x3000 embedded | 48% |
| Fujifilm X-E4 | 6240x4160 | 4416x2944 embedded | 71% |
| Fujifilm X-H2 | 7728x5152 | 2944x4416 embedded | 57% |
| Fujifilm X-H2S | 6240x4160 | 4416x2944 embedded | 71% |
| Fujifilm X-Pro3 | 6240x4160 | 4416x2944 embedded | 71% |
| Fujifilm X-S10 | 6240x4160 | 4416x2944 embedded | 71% |
| Fujifilm X-S20 | 6240x4160 | 4416x2944 embedded | 71% |
| Fujifilm X-T3 | 6240x4160 | 4416x2944 embedded | 71% |
| Fujifilm X-T4 | 6240x4160 | 4416x2944 embedded | 71% |
| Fujifilm X-T5 | 7728x5152 | 4416x2944 embedded | 57% |
| Fujifilm X100V | 6240x4160 | 4416x2944 embedded | 71% |
| Fujifilm X100VI | 7728x5152 | 2944x4416 embedded | 57% |
| Hasselblad X1D II 50C | 8272x6200 | 4136x3100 embedded | 50% |
| Hasselblad X2D 100C | 11664x8750 | 3888x2918 embedded | 33% |
| Leica CL | 6000x4000 | 6000x4000 embedded | 100% |
| Leica M10 | 5952x3968 | 5952x3968 embedded | 100% |
| Leica Q2 | 8368x5584 | 8368x5584 embedded | 100% |
| Nikon D6 | 5568x3712 | 5568x3712 embedded | 100% |
| Nikon D780 | 6048x4024 | 6048x4024 embedded | 100% |
| Nikon D850 | 8256x5504 | 8256x5504 embedded | 100% |
| Nikon Z 5 | 6016x4016 | 6016x4016 embedded | 100% |
| Nikon Z 50 | 5568x3712 | 5568x3712 embedded | 100% |
| Nikon Z 6 2 | 6048x4024 | 6048x4024 embedded | 100% |
| Nikon Z 7 2 | 8256x5504 | 8256x5504 embedded | 100% |
| Nikon Z 8 | 8256x5504 | 8256x5504 embedded | 100% |
| Nikon Z 9 | 8256x5504 | 8256x5504 embedded | 100% |
| Nikon Z f | 6048x4032 | 6048x4032 embedded | 100% |
| Nikon Z fc | 5568x3712 | 5568x3712 embedded | 100% |
| OM System OM-3 | 5184x3888 | 3200x2400 embedded | 62% |
| OM System OM-5MarkII | 0x0 | 3200x2400 embedded | 0% |
| Olympus E-M1MarkIII | 0x0 | 3200x2400 embedded | 0% |
| Olympus E-M1X | 5184x3888 | 3200x2400 embedded | 62% |
| Olympus E-M5 Mark III | 0x0 | 3200x2400 embedded | 0% |
| Panasonic DC-G9 | 0x0 | 1920x1440 embedded | 0% |
| Panasonic DC-G9M2 | 5776x4336 | 1920x1440 embedded | 33% |
| Panasonic DC-GH6 | 4336x4336 | 1920x1440 embedded | 44% |
| Panasonic DC-GH7 | 5776x4336 | 1920x1440 embedded | 33% |
| Panasonic DC-S1R | 8368x5584 | 1920x1280 embedded | 23% |
| Panasonic DC-S1RM2 | 0x0 | 1920x1280 embedded | 0% |
| Panasonic DC-S5 | 0x0 | 1920x1280 embedded | 0% |
| Panasonic DC-S5M2 | 0x0 | 1920x1280 embedded | 0% |
| Panasonic DC-S9 | 6000x4000 | 1920x1280 embedded | 32% |
| Pentax K-1 Mark II | 7360x4912 | 7360x4912 embedded | 100% |
| Pentax K-3 Mark III | 6192x4128 | 6192x4128 embedded | 100% |
| Pentax KF | 6000x4000 | 6000x4000 embedded | 100% |
| Ricoh GR III | 6000x4000 | 6000x4000 embedded | 100% |
| Ricoh GR IIIx | 6000x4000 | 6000x4000 embedded | 100% |
| Sigma fp | 3840x2160 | 3840x2160 embedded | 100% |
| Sigma fp L | 9520x6328 | 9520x6328 embedded | 100% |
| Sony α1 | 8640x5760 | 1616x1080 embedded | 19% |
| Sony α6400 | 6000x4000 | 1616x1080 embedded | 27% |
| Sony α6600 | 6000x4000 | 1616x1080 embedded | 27% |
| Sony α6700 | 6192x4128 | 1616x1080 embedded | 26% |
| Sony α7C | 6000x4000 | 1440x1080 embedded | 24% |
| Sony α7CM2 | 7008x4672 | 1616x1080 embedded | 23% |
| Sony α7CR | 9504x6336 | 1616x1080 embedded | 17% |
| Sony α7M3 | 6000x4000 | 1616x1080 embedded | 27% |
| Sony α7M4 | 7008x4672 | 1616x1080 embedded | 23% |
| Sony α7RM4 | 9504x6336 | 1616x1080 embedded | 17% |
| Sony α7RM5 | 9504x6336 | 1616x1080 embedded | 17% |
| Sony α7SM3 | 4240x2832 | 1616x1080 embedded | 38% |
| Sony α9M2 | 6000x4000 | 1616x1080 embedded | 27% |
| Sony α9M3 | 6000x4000 | 1616x1080 embedded | 27% |
| Sony ZV-E1 | 4240x2832 | 1616x1080 embedded | 38% |
Why it's fast, for anyone who cares
None of this matters to using it. But every number below was measured rather than assumed, and a few of them were surprises.
Pretty nerdy, right? But here you are, reading it…
What's coming
Free for now
Right now it is completely free, and there is nothing to sign up for — download it and use it. Down the road it becomes a $69 a year subscription, activated with a quick email sign-in, and everyone using it today hears about that well before it happens.
A nominal subscription is what keeps me actively developing it — fixing what people actually hit and building what they actually ask for, instead of shipping it once and walking away. That is the whole reason to charge anything at all.
Nobody gets surprised by that. If you are using it now you will hear about any change well before it happens, and the app will keep telling you plainly what it costs and when.
It works. Expect rough edges.
Built for my own culling and used every week. Signed and notarised by Apple, so it opens like any normal app. If something breaks or annoys you, tell me — that is the whole reason it is out here.
A photographer, not a software company

I'm Chris Schmauch, a Santa Cruz photographer. I shoot and edit over 300 sessions a year — weddings, proposals, families — and I've done it for the better part of two decades. In all that time I was never entirely satisfied with the culling tools on offer, AI or not, for a workflow that is fast-paced but highly curated. I decide; I just need deciding to be fast.
The honest reason is family time. If the work side of my life isn't ruthlessly efficient, the family side pays for it — so when the tool I need doesn't exist, I build it. This one started because I was tired of building 1:1 previews to answer a question I could see in half a second if the crop were just sitting there. Everything it does, and everything it refuses to do, comes from that. The measurements on this page are from my own shoots — and the reason there is no AI ranking is that I tried it on tens of thousands of my own photos and it did not work.
It sits on the same shelf as GoodEye Shoot Ingest, the card-ingest tool that gets the photos off the card and into the archive before CullMaster Pro ever sees them.